


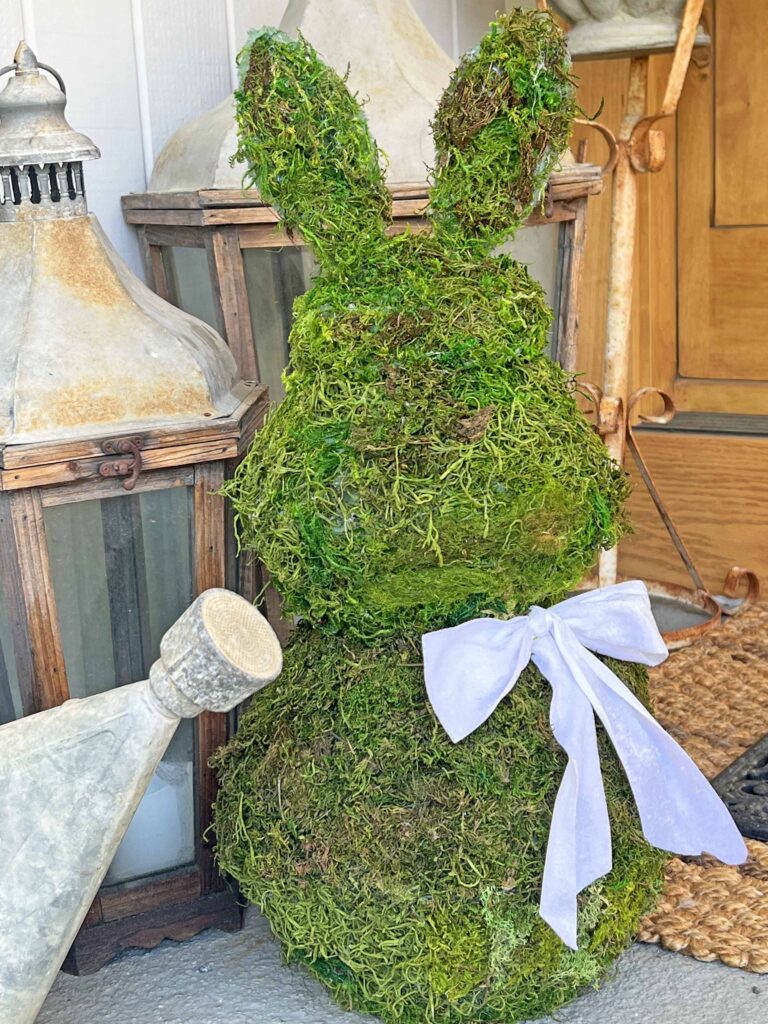
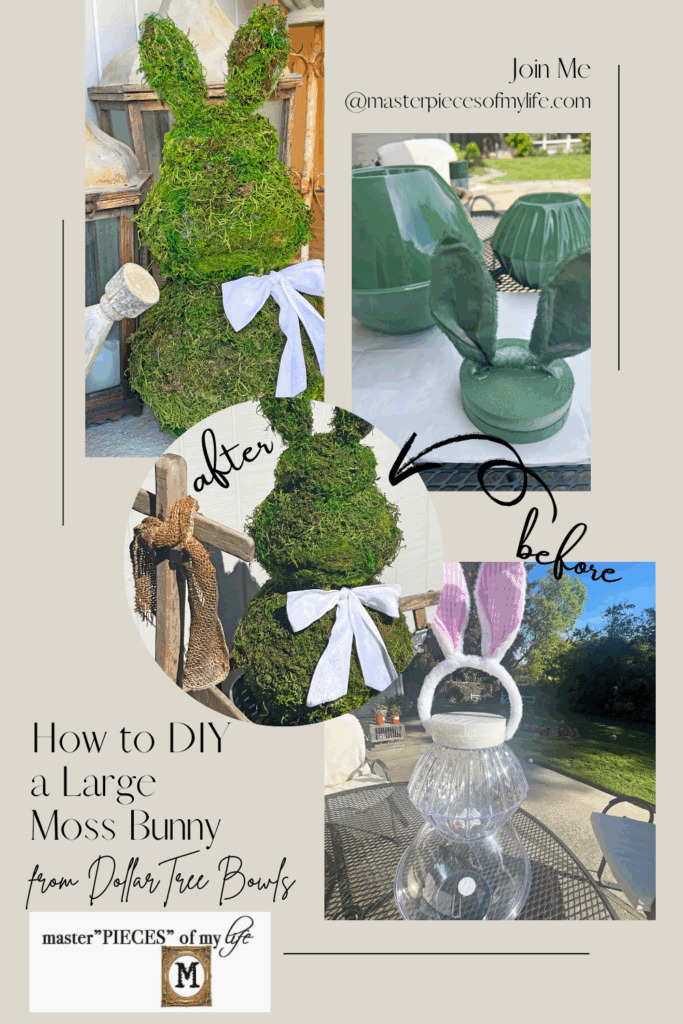
Are you ready for Easter? If you celebrate, I have a fantastic moss bunny DIY to share with you today. Even if you don’t celebrate Easter, bunnies are great spring and summer motifs to use in and around your home. This large moss bunny has all the wow factor, but is made from Dollar Tree plastic bowls. Yes, you read that right. Come on in and let me share how fun it is to DIY a large moss bunny from Dollar Tree bowls.

*Affiliate links might be included for your convenience. These affiliate links mean a small commission is earned if you make a purchase using these links at no extra cost to you. As an Amazon Associate qualifying purchases support this website. For more information: Full Disclosure Policy.
Inspiration for the Large Moss Bunny DIY
Ok, so if you’re crafter or decorator or simply spend time on social media (no judgement here) then you’ve probably seen this Dollar Tree bowls hack into adorable moss bunnies. Full disclosure, I’ve been wanting to make this for a few years now, but I was too intimidated.
It looked like many things could go wrong. It’s also a slightly messy project. Sometimes when I was feeling the inspiration, I couldn’t locate the right bowls at DT. And the excuses continue. It.just.did.not.feel.right. Until…all the stars aligned and I got the courage, the supplies and here we are.
During all the pondering, and hemming and hawing, I researched the project quite a bit and read a few tutorials. Everybody does it a little bit different although the main concept is constant. This is my take on the large moss bunny based on my crafting experience, ideas and supplies. I hope you find this inspirational to create your own large moss bunny from Dollar Tree plastic bowls. You won’t regret it, trust me. Let’s get busy!
How To DIY Moss Bunny from Dollar Tree Bowls
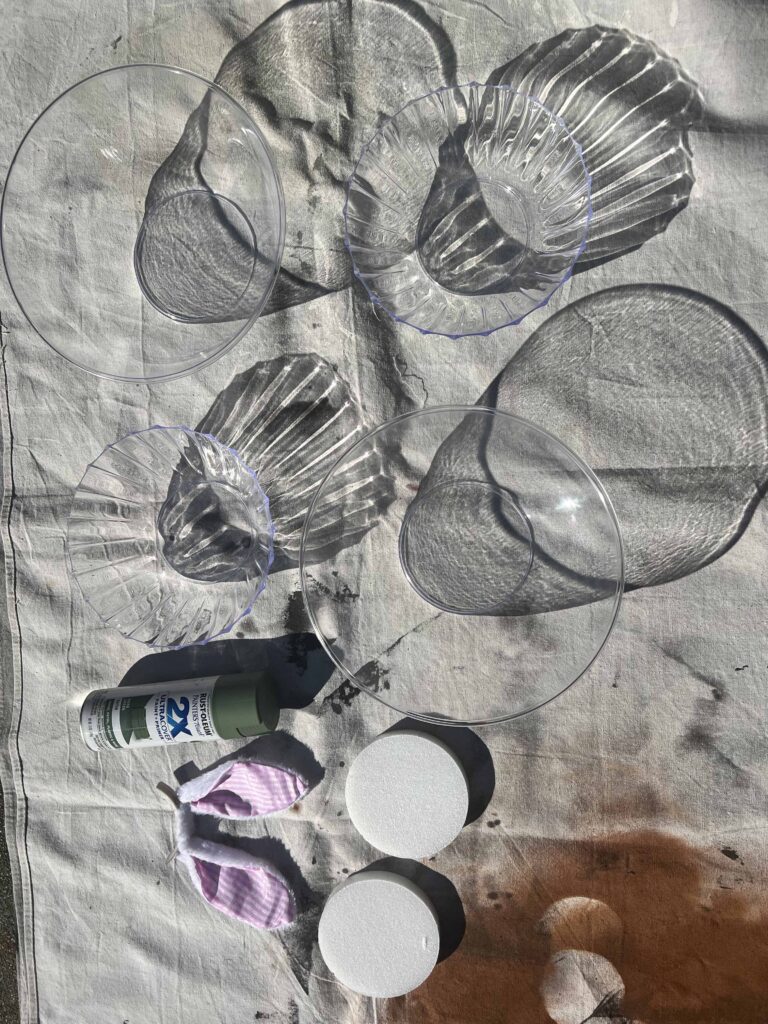
Supplies
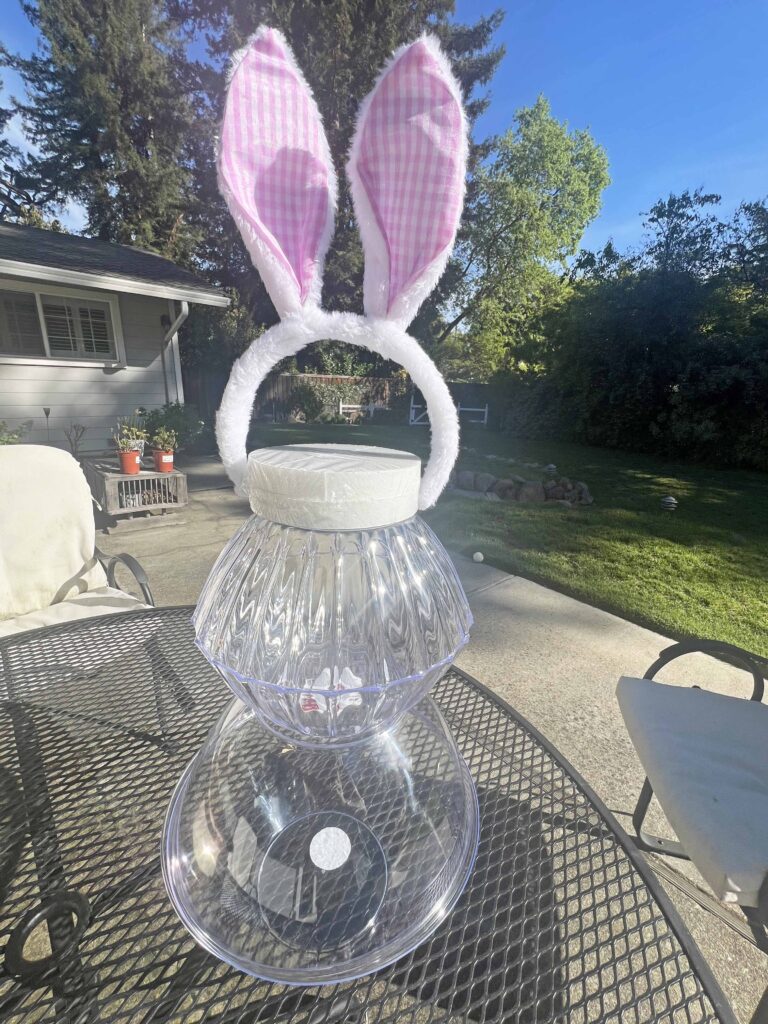
- 2 Large Plastic Bowls -11.25-inches wide
- 2 Small Plastic Bowls -8.5-inch wide
- 2 styrofoam rounds – 4.8-inch wide
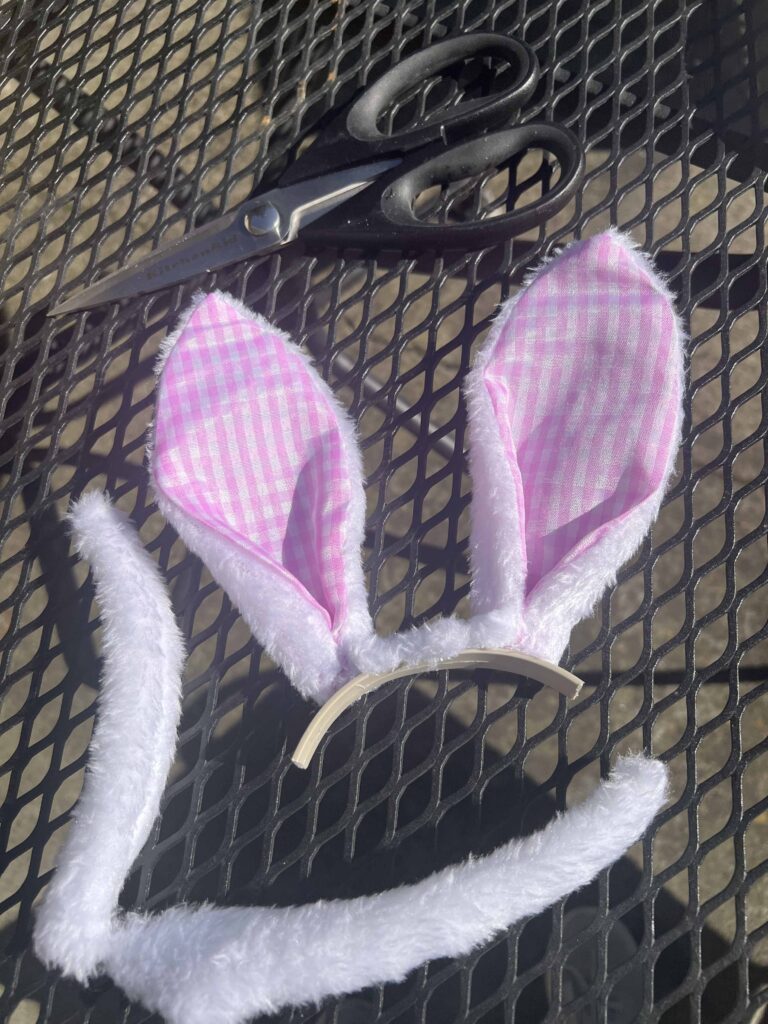
- Bunny Ears Headband
- Green Spray Paint
- E6000 Adhesive
- Moss, lots and lots of moss!
- Stones
- Clear Acrylic Coating Spray
- Pom Pom
- Ribbon
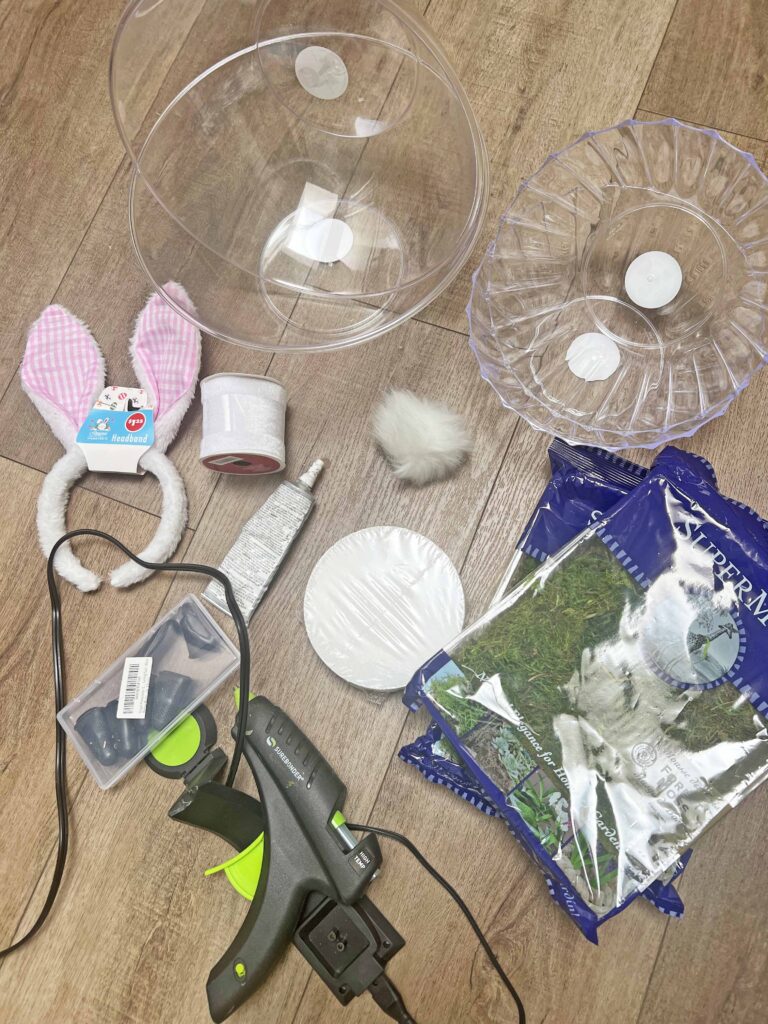
Tools
- Glue Gun & Glue Gun Glue Sticks
- Silicone Finger Protectors
- Scissors
- Craft Tweezers
Crafting Pro Tip: Read all the instructions through once and then re-read everything again. This way, you are familiar with everything you need and know what to expect.
Instructions
- Assemble all supplies and tools
- Remove all stickers from plastic bowls
- Disassemble bunny ear headband, leaving only ears and small parts of plastic headband
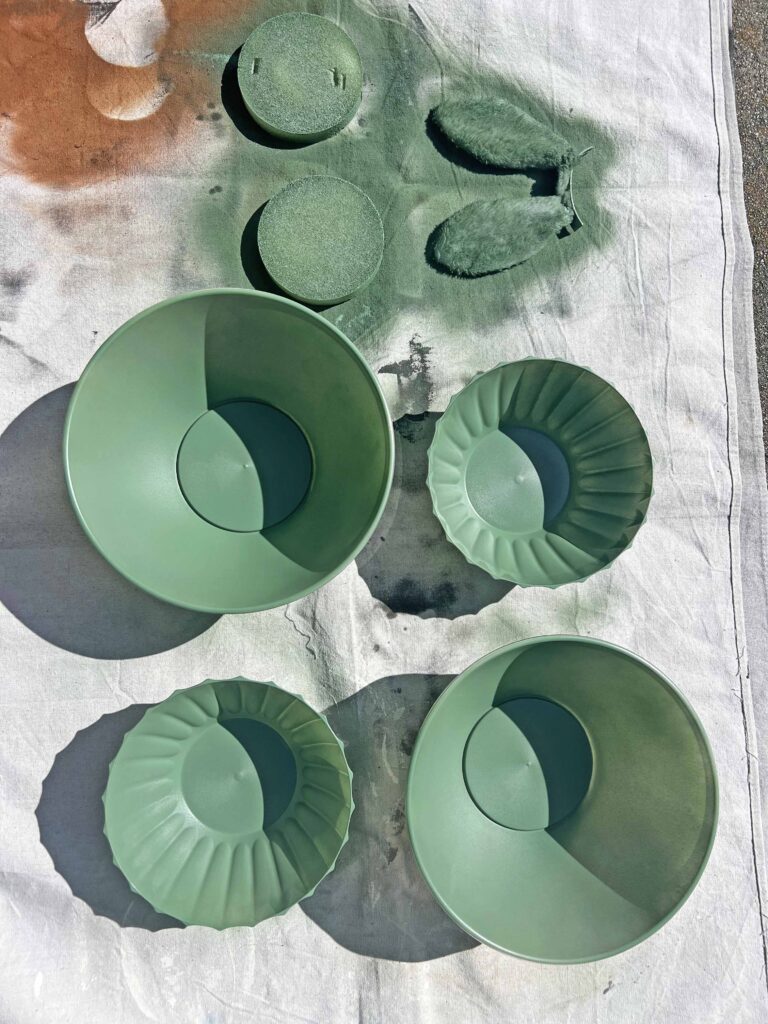
- Spray paint inside of bowls, styrofoam rounds and bunny ears (I used 2 coats on the bowls)
- Allow paint to fully dry before handling further
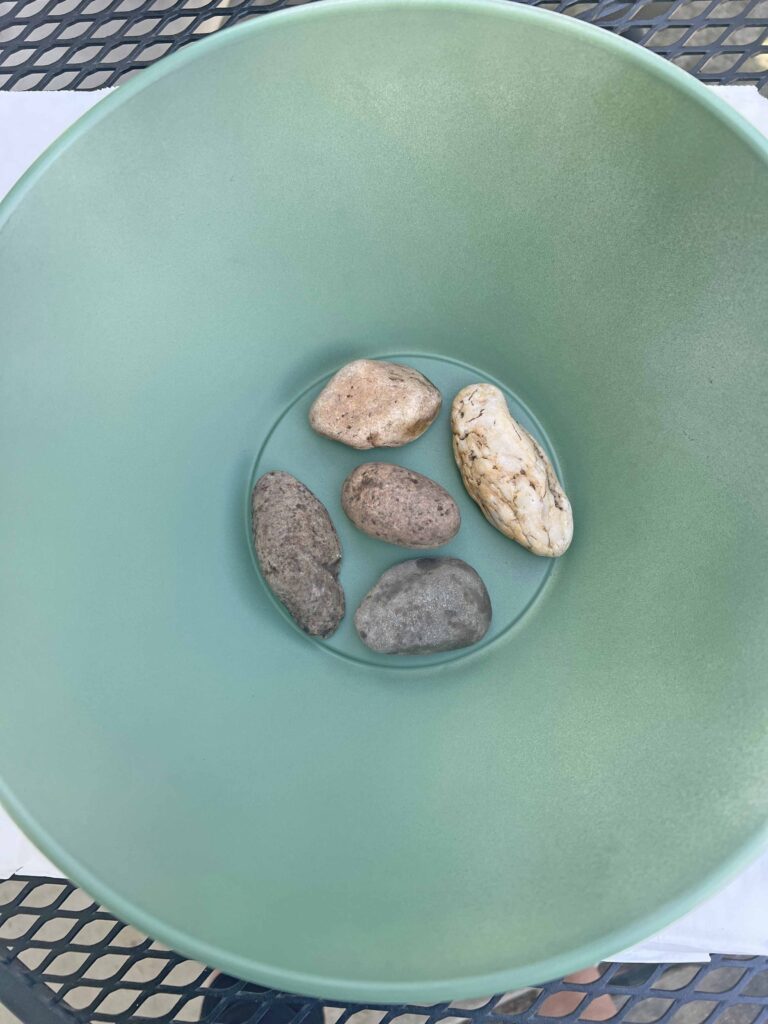
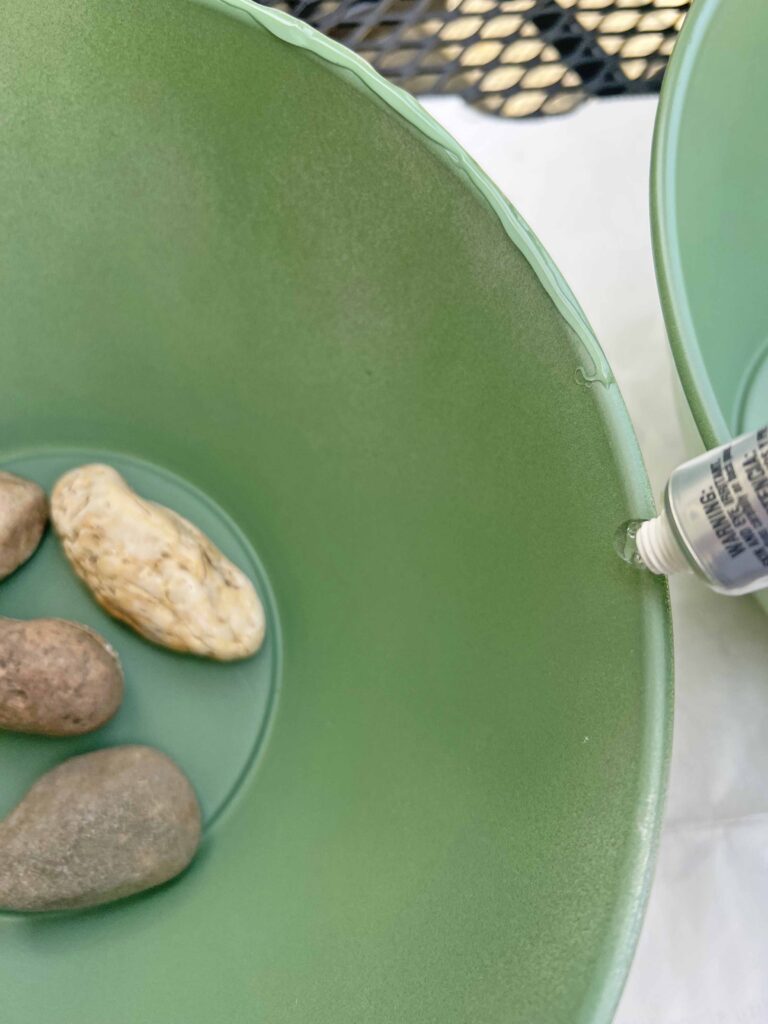
- Glue a few stones on the inside of one of the large bowls using hot glue gun to add weight for the base (I foraged these from my yard)
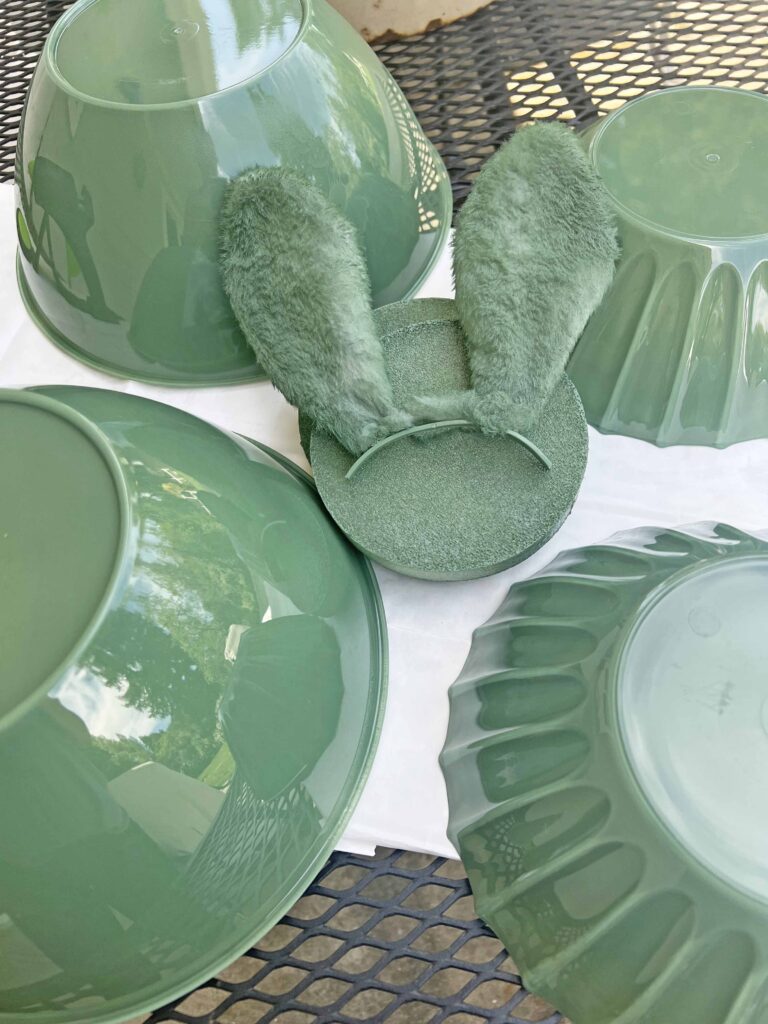
- Glue both large bowls together using E6000 around the rim and set aside
- Glue both small bowls together using E6000 around the rim and set aside
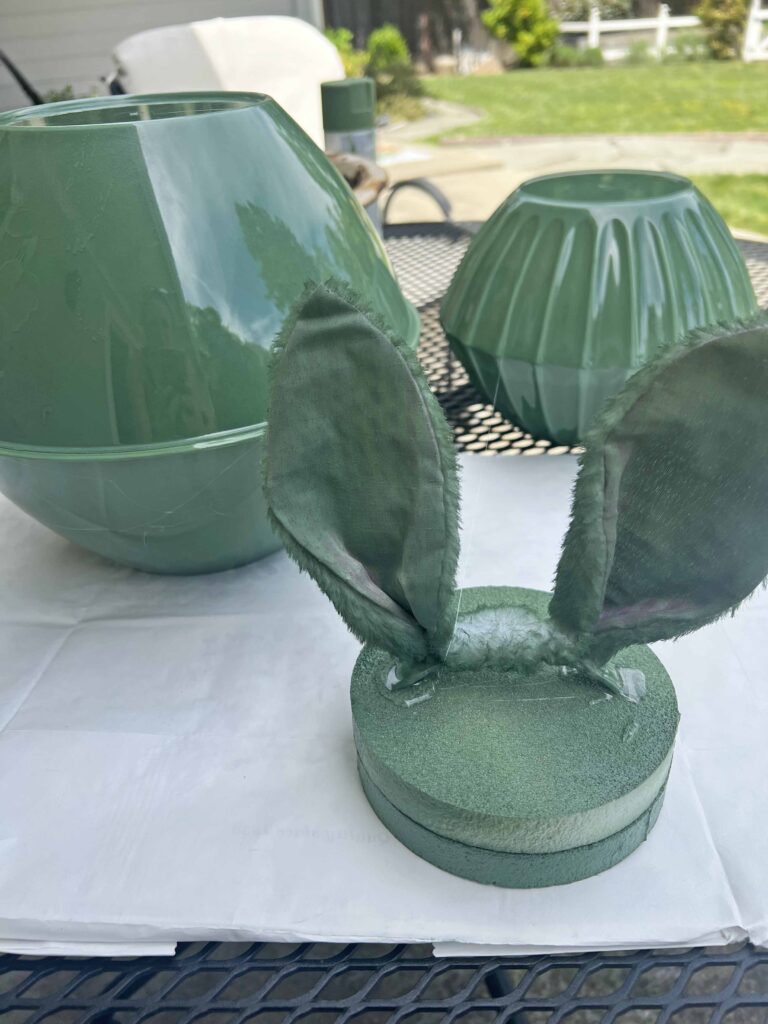
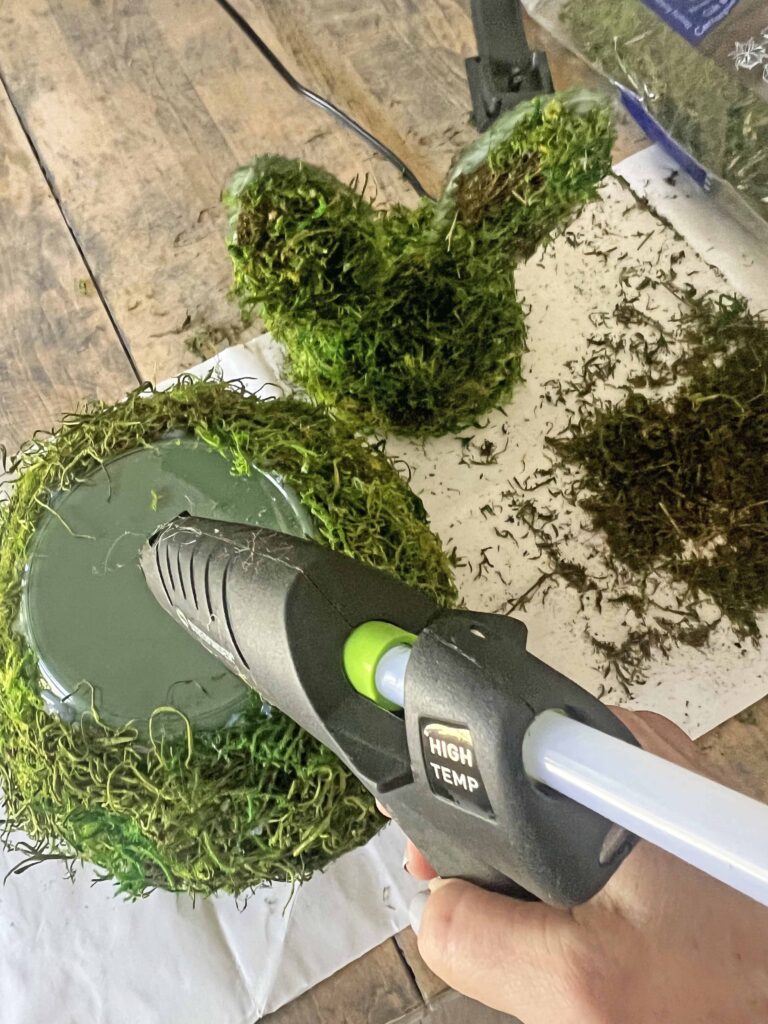
- Glue both styrofoam rounds together using hot glue gun
- Hot glue bunny ears centered on top of styrofoam rounds
- Allow all the glues to fully cure before handling further
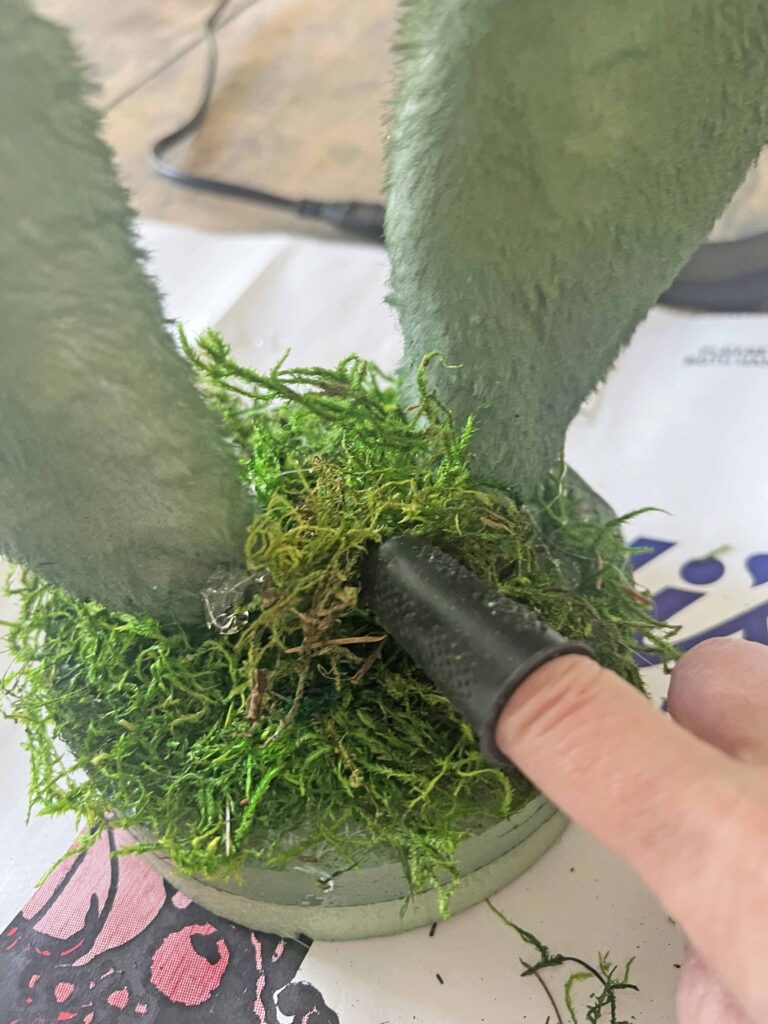
- Using hot glue gun adhere moss on ears and rounds covering fully (do not cover bottom)
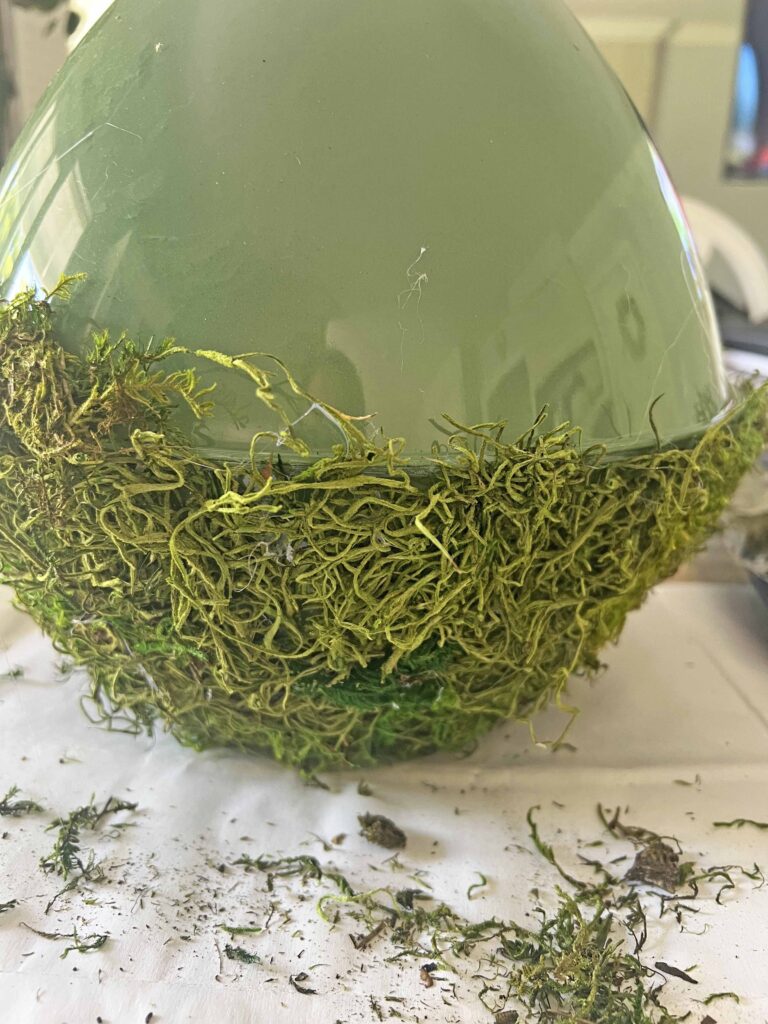
- Adhere moss covering all the sides of the small bowl shape (do NOT cover bottom or top)
- Adhere moss covering all the sides of the large bowl shape (do NOT cover bottom or top)

- Once moss is all set, assemble the bunny shape
- Using hot glue attach the small bowl set on top of the large bowl set (make sure the side with the glued stones is on the very bottom)
- Then attach the ear section on top of the small round shape
- Once everything is assembled together add moss to any sparse sections
- Use tweezers to remove glue strings
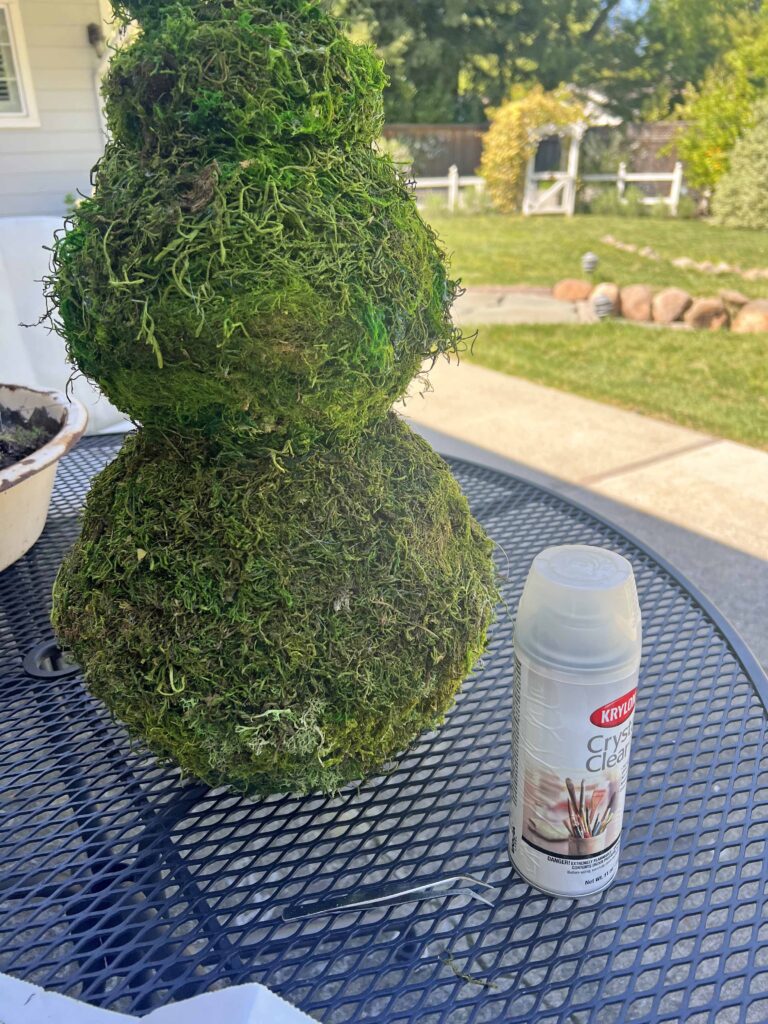
- Spray entire bunny with acrylic coating to seal
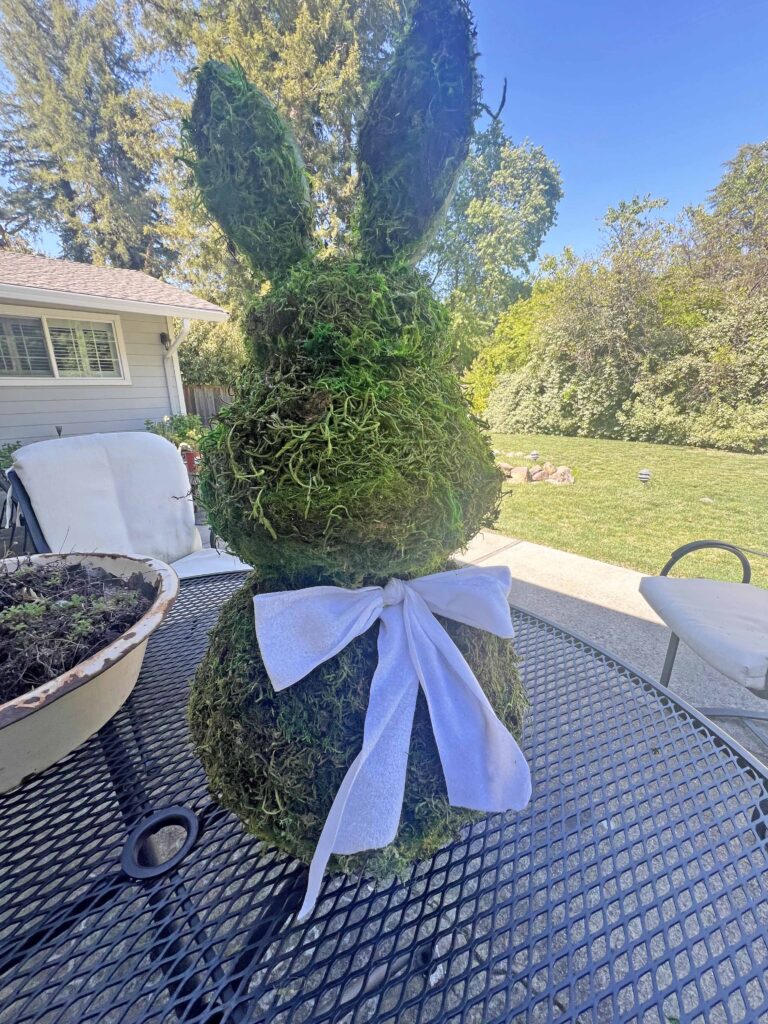
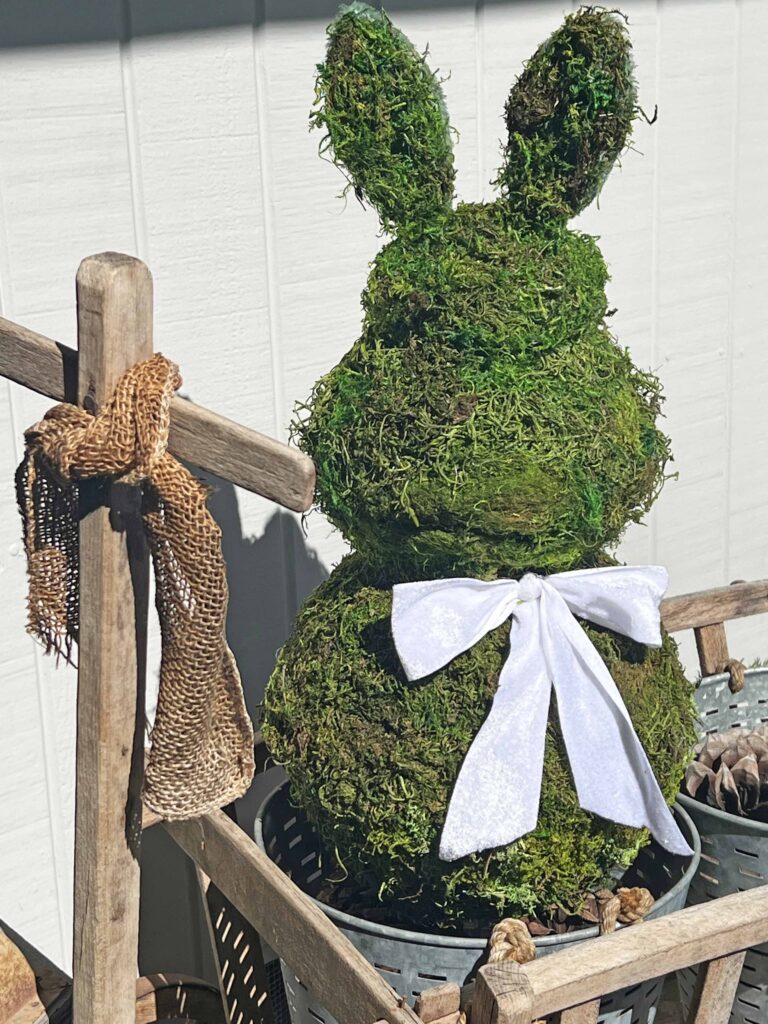
- Glue pom pom towards the bottom on the back of the bunny
- Add a ribbon around the bunny’s neck with a knot or bow
- Voila! Enjoy your amazing DIY Large Moss Bunny from Dollar Tree Bowls (who would know right?!?)
Warning: Please proceed with caution when handling a hot glue gun. Silicone finger protectors are highly recommended. Maintain personal discretion and responsibility at your own risk.
Tips & Tricks from Making the Moss Bunny
Green Paint Creates a Base
I thought this step wasn’t imperative for my project since I used clear bowls. I still added a layer of paint to reinforce the green color just in case. I’m glad I did. The green base helps the moss sit up and it’s more forgiving for openings in the moss. Dollar Tree has many different colors for their plastic party ware so if you can only find colored pieces then I highly recommend using green spray paint to coat the bowls. I used two coats of paint to intensify the green color.
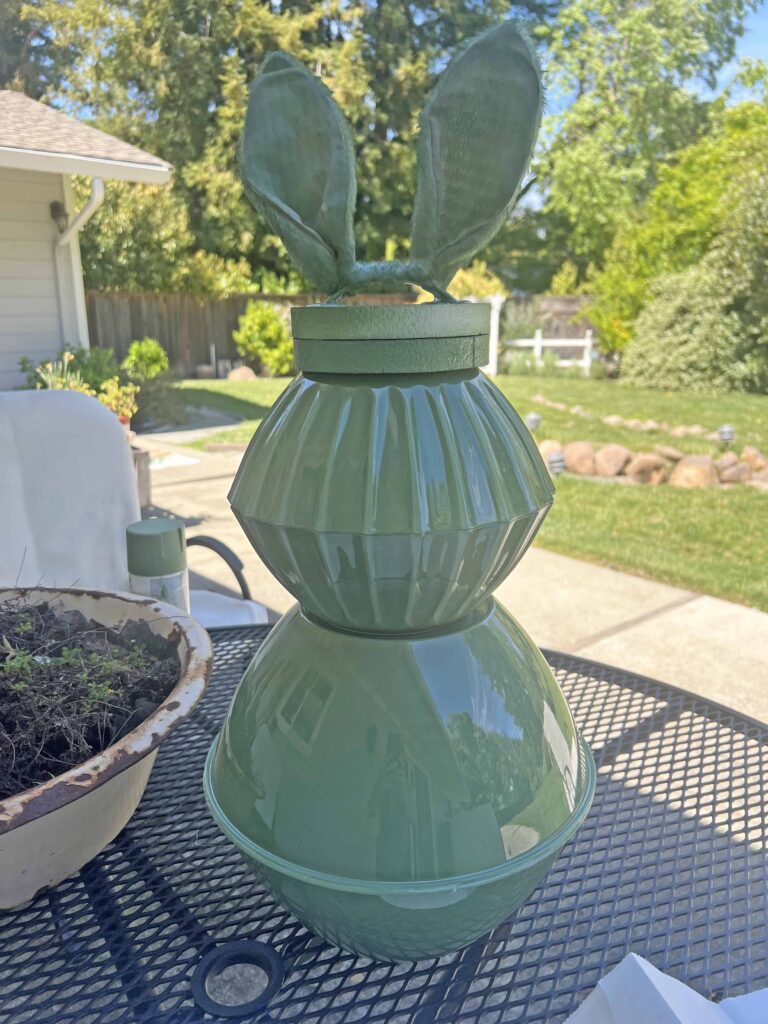
Also, I chose to spray paint the inside of the bowls since the bowls were clear and it would show through. I didn’t want to apply tons of hot glue on spray paint so this way it was on the inside. It might not matter at all, but I wasn’t sure what the chemical reaction would be so this was just a precaution if you want to keep that in mind.
Holy Moss Batman!
I’m not gonna lie, his project uses a lot, and I mean a lot of moss. Along with the moss you will need quite a few hot glue gun glue sticks. They go hand in hand in this project. But the end results are so worth the mossy bunny goodness. This DIY moss bunny is still half the price or less than those you can buy, so it’s worth it in my book..
Add Moss in Sections
Most of the tutorials I read covered the moss bunny once it was fully assembled. This seemed a bit cumbersome to me. I adhered the moss to each individual section first and then glued all the pieces together. Just make sure not to add moss to the tops and bottoms of each section where they will come together.
Stones Add Stability
The stones at the bottom of the large section anchors the bunny so it doesn’t topple over. This is mainly for outdoor purposes to prevent the wind from knocking Mr. Bunny over. You don’t want to add too many stones so the bunny is super heavy, just a few to give it some heft. If you don’t plan to use your moss bunny outside at all, you can simply skip this step.
Use Accents at Your Discretion
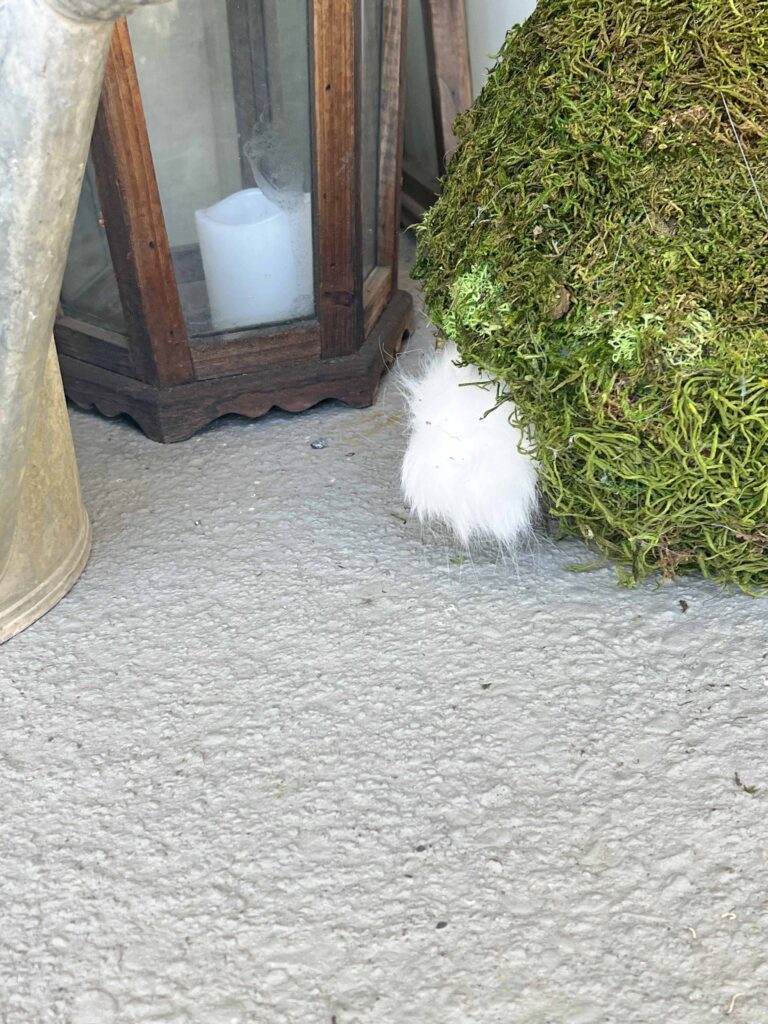
I wanted to use the pom pom puff for his bunny tail since I had it kicking around. The pom pom was left over from this project {easy sherpa pumpkin hack}. Remember? Another great Dollar Tree project hack. Anyway, when I decided to make the moss bunny I knew the poof would be the perfect cotton tail. I always save left over remnants from projects since you never know when or how they will come in handy.
Crafting Pro Tip: Save remnants and left over materials from a project, rather than throwing out or donating. Invariably the remnants will come in handy for a future project. Sometimes you just need a little piece of something, not requiring to buy a whole spool or package of something. It’s economical and practical.
I had also picked up the furry white ribbon at the Dollar Tree around the holidays, and I thought it was the perfect compliment to the white tail. Feel free to add ribbons that coordinate with your decor and style. I also contemplated leaving the ears fury white to coordinate with the tail and ribbon. Ultimately I decided it would look weird. What do you think? Regardless of the ears, that pouffy tail is everything.
Trust the Process
This DIY includes various steps or stages, but it all comes together seamlessly. Take your time, be patient and focus on each task deliberately. I made Mr. Moss Bunny over a two day period allowing myself to enjoy the process and not rush any of the steps. It’s very satisfying to see the end result when you look at what you started from.
Closing Thoughts
What do you think of the big mossy bunny DIY from Dollar Tree plastic bowls? I’m so glad I finally took the plunge and it’s perfect for my spring porch just in time for the Easter celebration. I have one more Easter project coming your way believe it or not. I’ll also share our porch ready for the season next week. So make sure to stop by or sign-up.
I appreciate your visit today, and I hope you leave inspired. Until next time friends. Au revoir!


Shop the Moss Bunny Look
- Preserved Moss Bunny Topiary
- Preserved Moss
- Hot Glue Gun
- Glue Gun Glue Sticks
- Silicone Finger Protectors
- Clear Acrylic Coating
- Crafting Tweezer
- White Furry Ribbon Trim
- White Pom Pom


More Related Posts

Most Recent Posts
Ideas are like rabbits. You get a couple and learn how to handle them, and pretty soon you have a dozen.”
John Steinbeck